Getting Started
To use CoPAS, you need to first install CoPAS CLI, a command line interface that manages CoPAS modules. The CLI is compatible with Windows (10 or higher) and Linux operating systems.
Installation
The following sections describe the installation of CoPAS CLI on Windows and Linux operating systems. It is distributed as an archive. After downloading the archive, we can extract it to see what's inside:
$ cd CoPAS
$ tree
.
├── copas
├── install-linux.sh
├── install-windows.bat
├── README.md
└── .wsl.ps1
We are mainly interested in the install-linux.sh and install-windows.bat files. These are the installers for Windows and Linux operating systems.
Install on Windows
Before installing CoPAS CLI, ensure you have the following:
- Internet access
- Administrator rights
- Virtualization enabled in BIOS settings
- Latest Windows updates installed
You can install CoPAS CLI by double-clicking on the install-windows.bat file. Alternatively, you can run the file from the terminal:
$ ./install-windows.batInstall on Linux
Before installing CoPAS CLI, ensure you have the following:
- Internet access
- Root access
- Virtualization enabled in BIOS settings
The Linux installation script supports the following options:
- --silent, -s
- Run in silent mode. This option assumes 'yes' to all questions
- --include-marketplace, -m
- Include the default CoPAS marketplace
- --help, -h
- Display help message
We recommend using the --include-marketplace option to include the default CoPAS marketplace. You can install CoPAS CLI by running the install-linux.sh file from the terminal:
$ ./install-linux.sh --include-marketplaceFirst Steps
This section provides a quick overview of how to use CoPAS CLI to download, run, and use your first CoPAS module. For this guide, we will use the csv-elk module, which is a CoPAS module for analyzing CSV files.
To start using the CoPAS CLI utility, simply type copas -h in your favorite terminal on Linux or Powershell/CMD on Windows.
To download a module, we can use copas module add <module-name>. For example, to download the csv-elk module, we use copas module add csv-elk:
$ copas module add csv-elk
Adding module "csv-elk:2.2"
2.2: Pulling from forensics/csv-elk
CoPAS will automatically download the latest version of the module. Which is currently version 2.2.
For more information about CoPAS modules, check out the Module Management section.
Creating Container from Module
Before we can start using the module, we need to create a container from it. To create a container, we can use copas create. We will be prompted to select a module to use and to enter a name for the container. So we will create a container named csv from the csv-elk module:
$ copas create
[?] Which module?: csv-elk
 ❯ csv-elk

No container name provided.
[?] How would you like to name the container?: choose
 ❯ choose
   generate

Container name: csv
The container named csv was created from the csv-elk module. We can list all containers and their state by using copas list:
$ copas list
                                                  CONTAINERS
--------------------------------------------------------------------------------------------------------------
Name                           Module                         Url                                      State
--------------------------------------------------------------------------------------------------------------
csv                            csv-elk:2.2                    http://localhost:7000                    stopped
We can see in the output, that the container is currently stopped. To start the container, we can use copas start:
$ copas start
There is only one stopped container: csv. Picking it.
Starting container "csv" ... DONE
URL: http://localhost:7000
This will automatically start the only available stopped container or prompt us to select a container to start if there are multiple stopped containers. After the container is started, we are provided with the URL of the container. We can use this URL to access the CoPAS UI and start with the analysis.
For more information about CoPAS containers, check out the Container Management section.
Looking at CoPAS UI
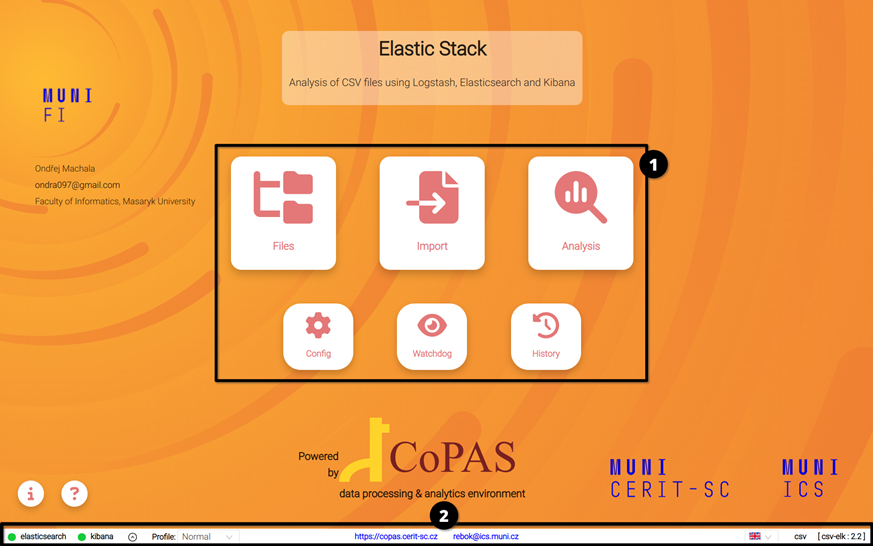
Now that we have successfully started a container, we can start using the CoPAS UI. After opening the provided URL in the browser, we are presented with the home page of CoPAS UI, which serves as the central hub, from where all the functionality is accessible. The home page is divided into multiple sections and can look a little bit different depending on the module.
We are mainly interested in the navigation section (1) in the middle of the page and the status bar (2) at the bottom of the page.

In the case of the csv-elk module, there are six icons in the navigation section from which we will be using the Import and Analysis icons.
For more information about the home page, check out the Home Page section.
Importing Sample Data
Before importing data, we need to wait for the module services to start. On the status bar, we can see the available services. For module csv-elk there are 2 services available: Elasticsearch and Kibana. Once the services light up green, we can start importing the sample data and start with the analysis.
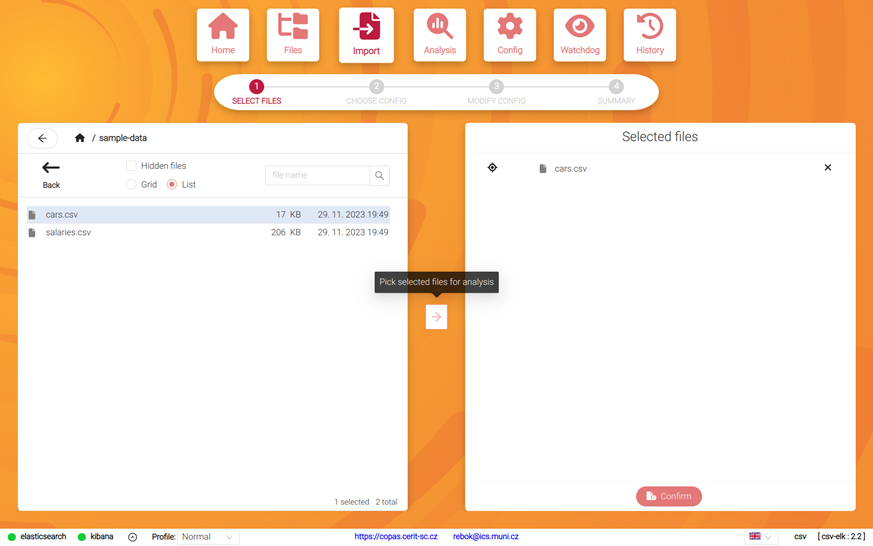
To start importing the sample data, click on the Import icon in the navigation section. After clicking on the icon, we are presented with the import page. Import consists of 3 main steps:
Step 1: Selecting Files for Analysis
First, we need to select the data we want to import. On the left side of the screen, there is a file manager you can use to locate the data. Navigate to the sample-data directory and click on the cars.csv file. After, you can click on the arrow icon in the middle of the screen to move the file to the right among the selected files.

Step 2: Choosing Analysis Configuration
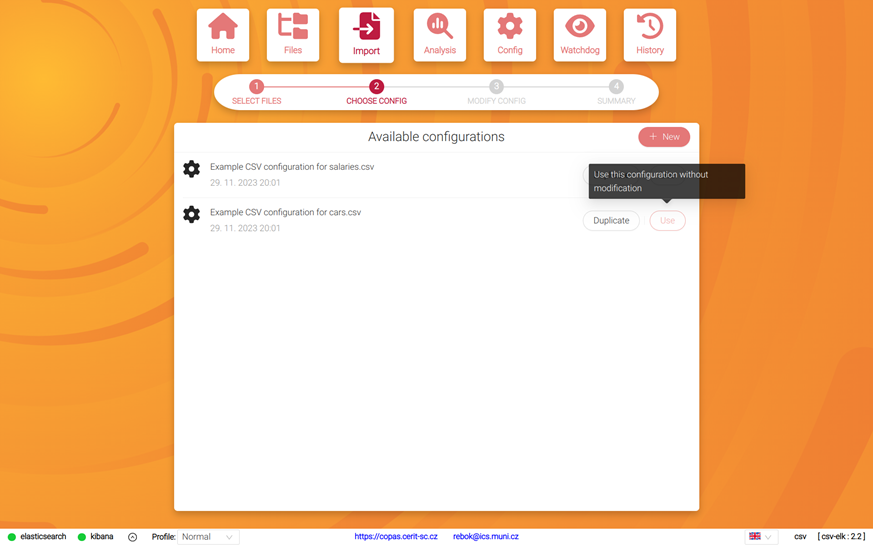
In this step, we need to choose the correct analysis configuration for the data we selected in the previous step. For the cars.csv file. select the Example CSV configuration for cars.csv and click the Use button to continue.

Step 3: Confirming the Import
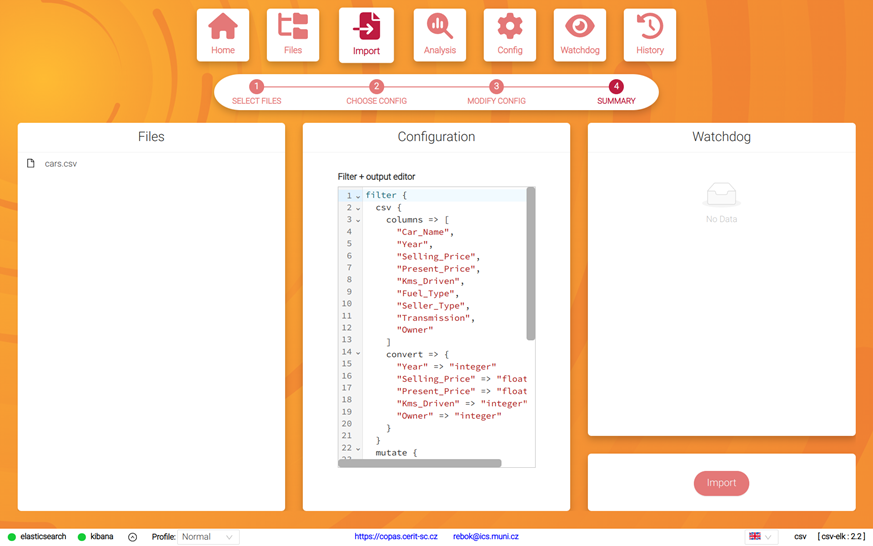
In the last step, we can see the summary of the import process. Click on the Import button in the bottom right to start the import process.

Starting with the Analysis
Once the sample data has been successfully imported (notification will appear in the bottom right corner), we can start with the analysis by accessing the Analysis UI. To access the Analysis UI, click the Analysis icon in the navigation section. This will open the analysis page, which is different for each module. In the case of the csv-elk module, we are presented with the Kibana UI.
Cleaning Up
Once we are done with the analysis, we can stop the container by using copas stop:
$ copas stop
There is only one running container: csv. Picking it.
Stopping the container "csv" ... DONE
If we want to also remove the csv container, we can use copas destroy:
$ copas destroy
There is only one container: csv. Picking it.
WARNING: Container is NOT backed up!
[?] Are you sure you want to destroy "csv"? (y/N):
Finally, we can remove the csv-elk module by using copas module remove csv-elk`:
$ copas module remove csv-elk
Removing module "csv-elk:2.2" ... DONE
Going Further
For more information about the CoPAS CLI and CoPAS UI and their detailed usage, check out the CoPAS Guide.